
준호씨의 블로그
크롬 플러그인 만들기 Hello, World! 본문
이 글은 http://code.google.com/chrome/extensions/getstarted.html 를 따라하기 하며 작성되었습니다 :) 크롬 플러그인 개발에 감을 잡기에 좋은 글이군요.

위의 그림과 같이 우측 상단에 아이콘을 추가 하고 flickr 사이트의 그림을 불러 오는 기능을 구현할 것입니다.
일단 텍스트 편집프로그램을 띄워서 manifest.json 파일을 작성합니다.
{
  "name": "My First Extension",
  "version": "1.0",
  "description": "The first extension that I made.",
  "browser_action": {
    "default_icon": "icon.png"
  },
  "permissions": [
    "http://api.flickr.com/"
  ]
}
http://code.google.com/chrome/extensions/examples/tutorials/getstarted/icon.png
위의 그림 파일을 같은 폴더에 저장해 둡니다.

도구 –> 확장 프로그램 들어가시구요.
오른쪽 상단에 "+ 개발자 모드" 라는 버튼이 있습니다.
그 버튼을 누르면 아래와 같은 화면이 나타나는데 "압축해제된 확장 프로그램 로드" 버튼을 누릅니다. 아까 작성한 플러그인이 들어 있는 폴더를 선택하면 아래 "My First Extension" 이 추가 됩니다.

짜잔~ 드디어 나타난 버튼입니다 :) 하지만 눌러 봐야 아무 반응도 없습니다.

아까 manifest.json 파일을 수정합니다.
...
  "browser_action": {
    "default_icon": "icon.png",
    "popup": "popup.html"
  },
  ...
형광팬 칠한 부분을 추가합니다.
http://src.chromium.org/viewvc/chrome/trunk/src/chrome/common/extensions/docs/examples/tutorials/getstarted/popup.html?content-type=text/plain 여기 소스 코드 내용을 popup.html 파일로 저장해서 같은 폴더에 저장해 둡니다.
부분별로 설명을 첨부 하자면
<style>
body {
  min-width:357px;
  overflow-x:hidden;
}

img {
  margin:5px;
  border:2px solid black;
  vertical-align:middle;
  width:75px;
  height:75px;
}
</style>
css를 지정해 주는 부분입니다.
<script>
var req = new XMLHttpRequest();
req.open(
    "GET",
    "http://api.flickr.com/services/rest/?" +
        "method=flickr.photos.search&" +
        "api_key=90485e931f687a9b9c2a66bf58a3861a&" +
        "text=hello%20world&" +
        "safe_search=1&" +  // 1 is "safe"
        "content_type=1&" +  // 1 is "photos only"
        "sort=relevance&" +  // another good one is "interestingness-desc"
        "per_page=20",
    true);
req.onload = showPhotos;
req.send(null);
ajax 로 flickr api를 호출합니다.
function showPhotos() {
  var photos = req.responseXML.getElementsByTagName("photo");

  for (var i = 0, photo; photo = photos[i]; i++) {
    var img = document.createElement("image");
    img.src = constructImageURL(photo);
    document.body.appendChild(img);
  }
}

// See: http://www.flickr.com/services/api/misc.urls.html
function constructImageURL(photo) {
  return "http://farm" + photo.getAttribute("farm") +
      ".static.flickr.com/" + photo.getAttribute("server") +
      "/" + photo.getAttribute("id") +
      "_" + photo.getAttribute("secret") +
      "_s.jpg";
}
</script>
가져온 사진들로 내용을 구성합니다.

다시 "도구 -> 확장프로그램" 으로 들어가서 "새로고침"을 클릭하면 플러그인이 다시 로드 됩니다.
다시 추가된 플러그인 버튼을 누르고 몇 초 기다리면 아래와 같은 팝업과 이미지들이 나타납니다 :)

감을 좀 잡으셨나요?
나머지는
http://code.google.com/chrome/extensions/overview.html
가서 공부하시면 되겠습니다 :)

'개발이야기' 카테고리의 다른 글
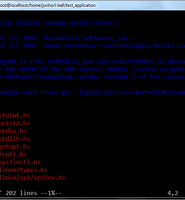
| 네이버 개발자센터에서 git와 mercurial 을 제공하는 군요 +_+ (4) | 2011.06.10 |
|---|---|
| Subclipse와 Subversive (4) | 2011.06.09 |
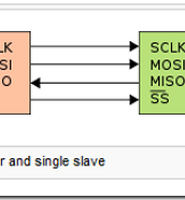
| SPI 삽질 이야기~ SPI 파형을 잡아라~ (6) | 2010.07.08 |
| 디바이스드라이버와 삽질하는 나날들... (0) | 2010.06.25 |
| VIVI - Virtual Video Driver 를 돌려 보다. (0) | 2010.06.23 |
